In order to properly lay tiles, there are various steps needed to be followed. Applying tiles is something that most people can do given a proper knowledge of doing so. Here are some basic tips to know for laying tiles properly.
- Prepare the surfaceBefore applying tiles, make sure that every surface is clean, smooth, dry, wax- free, soap scum-free, and grease-free. If tahere are areas to repair, patch, or if there are damaged or uneven surfaces, attend to it first. Then, remove any moldings, trim, or appliances that are placed in the surface you want to lay your tiles on.
- Layout the PatternAfter preparing the surface, mark the center point of each of your walls and snap chalk lines between center points of opposite walls to determine the center of the room. From the center point, place a row of loose tiles along the center lines in both directions. Use tile spacers for even and uniform joints. Upon reaching the walls, tiles must be cut for a proper fit.
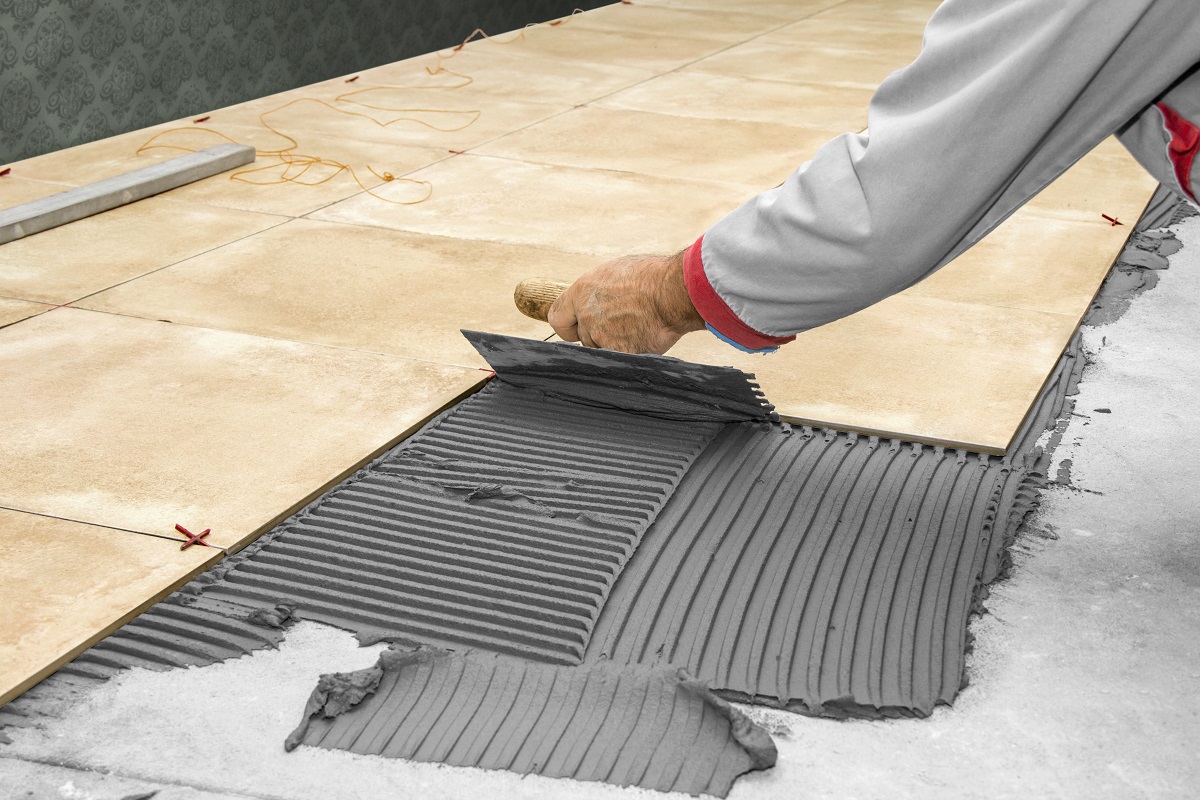
- Apply the AdhesiveOnly mix the necessary amount of adhesive needed to be used within 30 minutes. Using the flat side of an appropriate trowel type, spread a 1/4” coat on the on one grid area. Do not cover the guide lines drawn. Next, hold the trowel at a 45-degree angle and use the uneven side to comb adhesive into standing ridges. Removing the excess adhesive leaves behind a uniform ridged setting bed for your tiles. Avoid spreading a larger area of your adhesive that can be set in 15 minutes.
- Cut tile as neededCarefully mark measured cut patterns using a pencil or a felt-tip pen on the tile. Cute it with a tile cutter for pinpoint straight or diagonal cuts. For masterful curved cuts, you can use a nipper to chip away small pieces while a rod saw is best used for full-length curved cuts. After, smoothen sharp edges with a carborundum stone to achieve a soft finish.
- Laying the tilesNow that everything else is set, you can now install your tiles by starting in the center of the room, one grid at a time. With a slight twisting motion, set tiles one at a time and refrain from sliding them into place. Insert spacers between tiles and save the perimeter tiles in each grid for last. Leave a gap between the tile and wall. When a grid is fully installed, tap in all tiles using a rubber mallet or hammer and wood block. This is to ensure a solid bond and level plane. Use a putty knife to remove excess adhesive from joints and tiles to avoid uneven appearance. Leave everything to dry in 24 hours.
- Grout the JointsRead and follow all instructions and precautions on the grout package before beginning. Once done, remove the tile spacers and spread grout on the tile surface. Use a rubber grout float or a squeegee to force it down. Tilt the float at a 45-degree angle, and using its edge, remove the excess grout immediately. Then, tilt the float at a 90-degree and scrape it diagonally over the tiles. Let it set for 15-20 minutes before cleaning any residue from the surface using a damp sponge. Lastly, polish using a soft cloth when grout is fully dried. Leave it to dry for 72 hours. Now that you are aware of these steps, laying tiles across your room will not be a problem! Just always remember to ask experts if there are things you are unsure of.